Showing posts with label Kids cards. Show all posts

Wednesday, July 10, 2013

Superhero Fun.....

Hi all......

A quick post for you all today. I had to do a card for a Master turning 5 on the hop (so to speak) and I was left scratching my head as to what would go up very quickly. As if to answer my prayers, his mother poster a picture of him on Facebook celebrating his 5th birthday all dressed up as a superhero. LIGHTBULB!!!!!!!

I recalled a card I had seen by France Martin here. So I put my creative mind to task and this is what I came up with.....

 
I had a Cuttlebug spider web EF so I used that. The eyes were done with a 2 inch (white) and the SU 2 1/2 inch Circle punches. The "5" is cut with Silver glimmer paper with the Alphabet Typeset Bigz Dies.

 
The "mask" was dirtied up a little with some black ink on a sponge dauber. I got most of the ink off the dauber before applying it.
 
 
Thanks for popping by. Still have SOOOOOOOOOOO much to share!!!
 
Stuff Used:
CS: (SU) Basic Black, Whisper White , Real Red, Silver Glimmer Paper
Ink: (SU) Basic Black
Punches: SU 2 1/2 inch circle punch, Carla Craft CP21 Circle
Dies: SU Alphabet Typeset Bigz Dies
EF: Cuttlebug Spider Web EF
 
Lynda xx
 

Saturday, July 6, 2013

Banner Card for Master 8

Hi all,

Recently I had to make a card for Bestie's little boy who was turning 8. As usual, I left it to pretty much the last minute. I had hoped to do a punch art creation, but instead, I caught a glimpse of a card on someone's Pintrest board and I went form there.

The card I based mine on I found here (2nd card down) but as you can see it was a very girly card and I needed a real BOY card. I really liked the idea of the HB2U...especially for a boy. With that in mind, I created this......


Very much more for the 8 year old don't you think?? I used the Hearts a Flutter stamp set and co-ordinating framelits as well as the Typeset Alphabet Bigz dies. The WW background I thought was too barren, so I embossed it with the Chevron EF and then stamped the "splat" from Extreme Elements set in the co-ordinating colour beneath the banner. Because I stamped on the embossed paper, it gives it a really funky look.


The other element was some basic white crochet cotton and a WHOLE lot of dimensionals to have the banners "sit up". On the inside of the card I cut a banner from the Polka Dot DSP and layered an 8 cut from Silver Glimmer paper.


Thanks for popping by. Hope you perhaps got inspired a little. I have HEAPS more to share, just need the time to put it all together!!!
 
Stuff used:
CS: (SU) Pacific Point, Whisper White, Daffodil Delight, Real Red, Pumpkin Pie, Marina Mist, Polka Dot DSP, Silver Glimmer Paper
Ink: (SU) Daffodil Delight, Real Red, Pumpkin Pie, Marina Mist (last 3 stamped off for splats)
Stamps: (SU) Hearts A Flutter, Extreme Elements(ret)
Dies and Embossing: (SU) Chevron EF, Alphabet Bigz Dies, Hearts a Flutter Framelits
Other bits: Dimensionals, White Crochet Cotton, 1/16 hand held punch for holes in banners
 
Lynda xx

Sunday, June 30, 2013

Co-ordinated Gifts for Tweens


Hi all.

For regular readers of my blog, you know I LOVE a good box and co-ordinated gift. Recently whilst blurfing (blog surfing) I stumbled across Sam from Pootles Papercraft in the UK. She make ALL kinds of boxes and gifts and even does DO's for the visual learners amongst us.

The original contact I had with Sam's blog involved today's project. Miss 9 had 3 friends (twins turning 11 and a bestie at school turning 10) that needed gifts. Sam's box here was the perfect opportunity to give these gorjus boxes a whirl. Here is the finished projects.......

For the twins......... (remember to  click on the photos if you wish to make them larger)


 The card was inspired by this one.


Aren't these boxes just delish???? The lids close on an angle as you can see here. Sam's box did not cover the sides in DSP, but I really liked the look of this.


 The pencils I found in the Reject Shop. Pack of 12 for $2....so bargain indeed. I popped them in a skinny cello bag and made a topper with the 2 3/8" and 1 1/4" Scallop Circle Punches and you get this....(the stamp set I used is an old retired SAB set).


 Now for Miss Turning 10....well it was the same idea, but just a different colour combination.....and it HAD to be PINK!!! (insert exasperated pink-ugh sigh!!)


The card was inspired by LeeAnn Greff. It was in her January Newsletter, but I cannot find a pic of it to share with you. The thing I loved about it was the seamless transition between the embossed CS and the ribbon. She (I think) must have used the simply scored, but I used the "x" emboss of the Needlepoint EF's.


Thanks for popping by. If you are in Sydney, I hope you are high and dry. The rain has been INSANE.....seriously...I think we are near 10 days straight now. I can't recall seeing rain this heavy and persistent for a long time.

Addit.....

Oops...I am such a bad Mumma!!! Miss 9 received some card making stamps and supplies for her birthday (early June) and was very keen to make the twins a card each. I helped with the corner decorations....it is the Postage Stamp punch cut on the diagonal. Worked a treat!!! This is what she made......


Stuff used:
CS: (SU) Tangerine Tango, Tempting Turquoise, Island Indigo, Pretty in Pink (retiring soon...sniff), Rose Red, Whisper White, Sycamore Street DSP (SAB '13) Island Oasis DSP (ret)
Ink: (SU) Tangerine Tango, Tempting Turquoise, Summer Starfruit, Old Olive, Pretty in Pink, Pear Pizzaz, Rose Red
Stamps: (SU) Madison Avenue (SAB '13), Lovely Letters Alphabet,  Petite Pairs, Amy R - Birthday Sentiments
Punches and Dies: (SU) Labels Collection Framelits, Fun Flowers Bigz L Die, Scallop Circles in 2 3/8", 1 1/4" and 7/8", Circles in sizes 3/4", 1" and 1 1/4", SU Needlepoint EF, Memory Box Numbers Die
Other bits: LOTS of dimensionals, Vintage Faceted Buttons, Double sided tape.

Lynda xx


Tuesday, June 11, 2013

Cheeky Monkey !!!

Morning all,

For those in Australia, I hope you all had a wonderful Queen's Birthday long weekend. I hope you all got a little inky and creative.

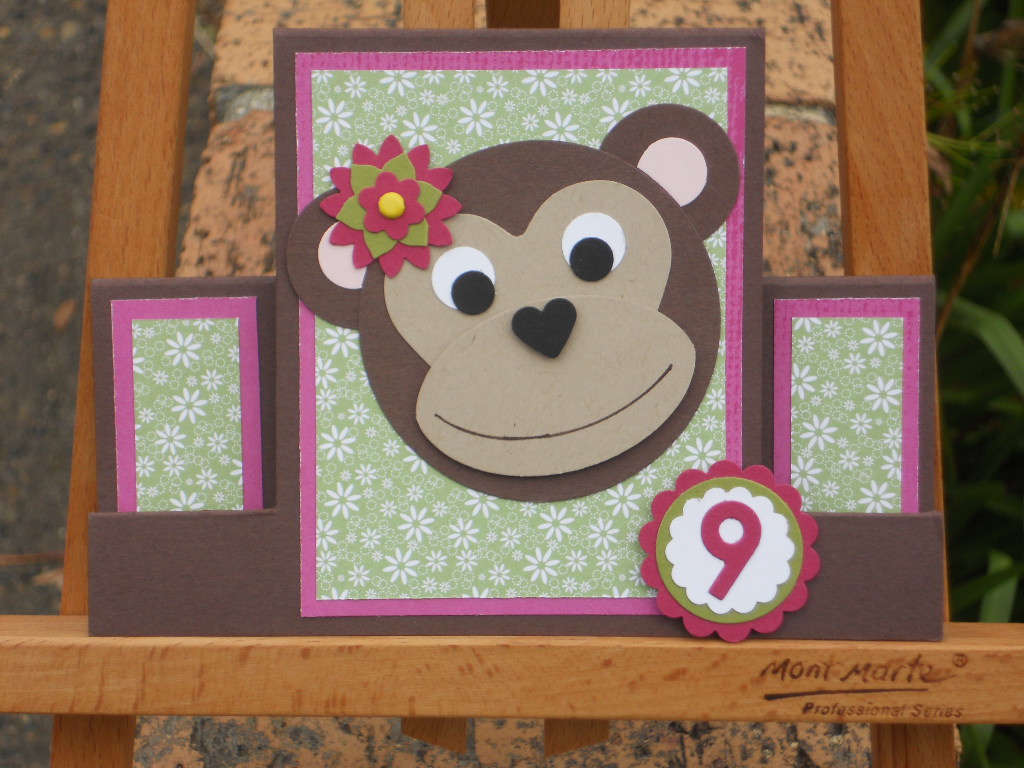
Last Monday (3rd June) My Miss 8 became Miss 9. We have (endured) her meticulously crossed off  30 day count down to her special day. She is growing into a very cheeky little one (of course totally unaware as to where she acquired that trait from!), hence the inspiration for this ensemble.

I also took a lot of inspiration from Di Barnes with her card here. This is the card I created for her.......


It is a centre step style card. I based it in a tutorial from SCS here but continued all the cuts to the back as well (hope that makes sense?) It stands so nicely.....

 
I coupled her card with a matching box made with the Fancy Favour Box Die (which I LOVE!!!)
 
 
The box was the same front and back and I used the flower motif on the sides to secure the handle.
 
 
Now I can hear you ask...."what is in the wee white bag??" Well, my Bestie Tracey, she makes children's jewellery. She has an Etsy shop here and you can also find her on Facebook under Berry-licious. Whilst the 2 of us were at Craft Camp this year I asked her to make a special set for Miss 9 and this is what she came up with.......
 
 
Here is the card and box together.......
 
 
Thanks so much for popping by. I am hoping my very first "pre-order" for the new 2013/14 catalogue arrives today or at the latest Thurs. There are SOOOOOOO many delicious things to see and share with you.
 
Stuff used:
CS: (SU) Chocolate Chip, Crumb Cake, Pretty in Pink, Basic Black, Whisper White, Purely Pomegranate (ret), Holiday Treasures DSP (ret), unknown SU Old Olive DSP
Stamps: NONE
Punches: As per Dawn Olchefske's tute here for the monkey - however I did not have the face punch so I used a Carla Craft CP21 Heart instead and a CP1 heart for the nose, 1 1/4" Scallop Circle,1" circle, 7/8" Scallop Circle, 1/2" Circle, Boho Blossoms Punch, Carla Craft CP1 Vinca B punch, Memory Box Numbers Die
Ink: (SU) Chocolate Chip SWM for the mouth.
Other Bits: LOTS of Dimensionals, SU Fancy Favour Box Die, Generic yellow Brads
 
Lynda xx


Friday, June 7, 2013

Punch Art Fun and Games......

Morning all.

Firstly, thank you all so much for your blog love and encouragement on my return to blogging. It was overwhelming.

Today, I am again combining a couple of projects done over the past couple of months that have a common theme. Today - Punch Art.

As most of you are aware, I was an avid punch artist before I discovered stamping, now I get to combine the two and make some fun creations.

Recently my DH's niece turned 2. I had seen this card on Andi Potler's blog and fell in love with it immediately. I had to do it for Pippa!! This is my version......

 
It went up so quickly and it is basically circles!!! It sits up nicely on dimensionals.....and the only Whisper White to be seen is the eyes!!!


Next two cards were done for a customer. They wanted a "girly robot" card for their niece and a "Russian" themed birthday card as they would be in Russia for the wife's birthday!!! God bless Google!!! This is what I found......

Girly Robot......again seen here on Andi Potler's blog.....

 
I did change a couple of things on Andi's punch list, but the majority are the same. The background of the robot is a FAB embossing folder by Cuttlebug called "Clockworks and was so perfect for this card. I also created a small "button" on the melon Mambo strip for a bit of fun. Each layer is separated by a dimensional so it is really squishy to push on.


Something I very rarely (and probably should do more of) is stamp the inside of my cards. The SU Clockworks set provided a good continuing theme for this card.


Lastly...the Babushka's were inspired by a Deb Fearns card seen here. This is my version of her card....
 
 
I used the punches that Deb listed, with the exception of the hair dos and the lips. The hair was achieved with (fm L - R) The mid portion of the old butterfly punch, the scallop border punch and the base of the heart punch. Here they are close up...


Now the mouth....I like to use everything.....and this is no exception. The mouth is the punch out scrap from the SU Pinking Heart Border Punch. It was PERFECT!!!
 
Thanks again for popping by and tolerating all the photos!! Two posts in a week is a good start to my new regime. It is all baby steps.
 
I am not going to list ALL the supplies used in these cards, but please, if you have any questions, please leave it in the comments and I will answer it for you.
 
Lynda xx


Saturday, February 2, 2013

Perfect Punch Art Pooch

Hi all,

Once again, apologies for the length of time in between posts. There has been MUCH going on under our roof. The children went back to school this week (Miss 8 into year 4 and Master 12 started HIGH SCHOOL!!!!!) where does the time go....seriously??

Now I have also been dropping some hints recently about some BIG NEWS that was happening....and well finally it came to be (and for all those incredibly funny folks out there NO I am not pregnant!!) On the 23rd of January, I (finally) signed up and I am now a Stampin' Up Demonstrator!!! I have had to read a lot, learn much more about my computer 9than perhaps I would have liked to) and I have had the UBER patient Angela Sargeant as my mentor and guide. I cannot thank her enough for helping me through all the oopses and lingo.

Now....onto the card. Also in the time since last posting, a friend of mine had a little boy who turned 1!! Such an occasion cannot go by unheralded. I have had this card in my CASE file for some time and thought it perfect for the birthday boy. It is punch art, which of course I LOVE, so it was an easy decision. I stepped up certain elements of the card and this is what I came up with.....(you can click on the image to make it bigger)

 
I just think punches are the best. Whilst I enjoy my stamping, punch art is what I did before I stamped and it is something I can combine with stamping with ease. The other huge effort in this card is that I used all brights...with the exception of pooch of course!!
I stamped the large banner from Pennant Parade in the same colour as the "flag" and then spaced them out across the card. Light bulb moment came when I realised that the birthday boy's name had 4 letters....so I cut out the letters and the #1 in gold glitter board and snap...easy peasy. A couple of dimensionals here and there and it was done.
 
 
Thanks for popping by, especially if you are visiting via Beth Beard's blog. I would love to hear your thoughts and comments on this card. Beth and I got to know each other via a crafting forum and she has been an amazing friend and supported, even though we have never met (given she is in the USA and I am here is Australia. It is a cool near 25000kms between us, if you believe Google Maps here. I hope you can drop by from time to time.
 
Stuff Used:
CS:(SU) Pacific Point, Whisper White, Tangerine Tango, Rich Razzleberry, Daffodil Delight, Real Red, Crumb Cake, Chocolate Chip, Basic Black
Ink: (SU) Rich Razzleberry, Pacific Point, Daffodil Delight, Real Red, Crumb Cake, Chocolate
Stamps: (SU) Pennant Parade
Punches: (SU)2/12 inch Circle, Blossom Builder Punch, Pennant Builder Punch, Ornament Punch, Owl Punch (small circles for eyes)
Other bits: SU Chevron EF, Cuttlebug Swiss Dots EF, Cuttlebug Olivia Alphabet, Ice Cream Parlour Buttons (ret), Gold Glitter CS
 
Lynda xx


Monday, October 15, 2012

Angry Birds - II

Morning all.

Please forgive the length between posts of late. Someone appears to have left the gate open on my life and all is coming and going MUCH quicker than I would like!!!


I wish to share with you the 2nd of the Angry Birds cards I did. You will find all the links for tutorials etc in my previous post here. This one involves the YELLOW angry bird.....

 
Once again I used Paula Dobson's cloud making technique to do the sky of which the link is in my previous post. I love the look that it gives and it cleans so very easily too....a BIG bonus!!
 
 
Here is the yellow bird close up. If you can believe it, the hardest thing to do was the darn eyebrows!!! Thankfully I had an epiphany....I used a triangle punch and I trimmed 2 of the sides. Worked a charm!
 
 
Here is the bird and his sling shot. Yes...I persevered with the PVA and the rubber band, but this time I knew what I was up for and was prepared.
 
 
Thanks for popping by and for you patience with my tardy posting. Be back soon....I promise.
 
Stuff used:
CS: (SU) Pacific Point, Basic Black, Whisper White, Crumb Cake, Real Red, Pumpkin Pie, Pear Pizzaz, generic yellow textured CS and blue glitter CS fm Alice's
Ink: (SU) Bashful Blue, Crumb Cake and Soft Suede (sponging the sling shot)
Punches: Pretty mych same as prev Angry Birds post with the addition of Carla Craft CP-11C heart punch (bird's body), Francheville triangle punch, Carla Craft CP1 Sun punch (hair and tail), Carla Craft CP8 Heart Punch (beak)
Other Bits: as per prev post, plus Cuttlebug Olivia Alphabet
 
Lynda xx


Monday, October 8, 2012

Angry Birds - I

Morning all.

I finally jumped on the Angry Birds bandwagon. I only played the game (for the 1st time) not so long ago. When I am out shopping, I see them everywhere...on T-shirts, plush toys, activity books...you name it, they are there. Therefore, it was not a hard stretch to make them into a card!! If you put it into your Google search engine, it goes NUTS!! There are also many fantastic examples on SCS.

I was lucky enough to find a brilliant Angry Birds tutorial by Niki Toll here. It was really easy to follow and the results were so much fun!! I got the inspiration for my card here. This was the result.....

 
The hardest darn thing to do was to get the darn rubber band to stick to the CS!!! Finally with tweezers and a lot of PVA...I got there!! I textured the sling shot with with the Cuttlebug "Branches" EF and then sponged the embossed bits with Crumb Cake and Soft Suede ink. Came up alright I think! 
 
One of my favourite bits of doing this card was the sky!! I got the idea from the uber talented Paula Dobson here. Needless to say, since having the acetate template, I have used it heaps!! I cut out different sized scalloped circles and ovals and then put them together with DS tape.  Gives such a good result....
 
 
Here is the red Angry Bird a little closer up.....
 
 
....angry wee bird ain't he???
 
Thanks for popping by....I gotta fly (yes pun intended!!) I have another Angry Bird to share with you soon as well as much more!
 
Stuff Used:
CS: (SU) Real Red, Basic Black, Whisper White, Pear Pizzaz (ret), Crumb Cake, Pumpkin Pie
Ink: (SU) Stazon, Bashful Blue, Crumb Cake, Soft Suede
Stamps: Clear happy birthday stamp fm stash
Punches: As per Niki's tuorial and CP8 Carla Craft heart, Martha Stewart Grass Punch
Other bits: Dimensionals, generic rubberband
 
Lynda xx