Showing posts with label Boxes. Show all posts

Sunday, June 30, 2013

Co-ordinated Gifts for Tweens


Hi all.

For regular readers of my blog, you know I LOVE a good box and co-ordinated gift. Recently whilst blurfing (blog surfing) I stumbled across Sam from Pootles Papercraft in the UK. She make ALL kinds of boxes and gifts and even does DO's for the visual learners amongst us.

The original contact I had with Sam's blog involved today's project. Miss 9 had 3 friends (twins turning 11 and a bestie at school turning 10) that needed gifts. Sam's box here was the perfect opportunity to give these gorjus boxes a whirl. Here is the finished projects.......

For the twins......... (remember to  click on the photos if you wish to make them larger)


 The card was inspired by this one.


Aren't these boxes just delish???? The lids close on an angle as you can see here. Sam's box did not cover the sides in DSP, but I really liked the look of this.


 The pencils I found in the Reject Shop. Pack of 12 for $2....so bargain indeed. I popped them in a skinny cello bag and made a topper with the 2 3/8" and 1 1/4" Scallop Circle Punches and you get this....(the stamp set I used is an old retired SAB set).


 Now for Miss Turning 10....well it was the same idea, but just a different colour combination.....and it HAD to be PINK!!! (insert exasperated pink-ugh sigh!!)


The card was inspired by LeeAnn Greff. It was in her January Newsletter, but I cannot find a pic of it to share with you. The thing I loved about it was the seamless transition between the embossed CS and the ribbon. She (I think) must have used the simply scored, but I used the "x" emboss of the Needlepoint EF's.


Thanks for popping by. If you are in Sydney, I hope you are high and dry. The rain has been INSANE.....seriously...I think we are near 10 days straight now. I can't recall seeing rain this heavy and persistent for a long time.

Addit.....

Oops...I am such a bad Mumma!!! Miss 9 received some card making stamps and supplies for her birthday (early June) and was very keen to make the twins a card each. I helped with the corner decorations....it is the Postage Stamp punch cut on the diagonal. Worked a treat!!! This is what she made......


Stuff used:
CS: (SU) Tangerine Tango, Tempting Turquoise, Island Indigo, Pretty in Pink (retiring soon...sniff), Rose Red, Whisper White, Sycamore Street DSP (SAB '13) Island Oasis DSP (ret)
Ink: (SU) Tangerine Tango, Tempting Turquoise, Summer Starfruit, Old Olive, Pretty in Pink, Pear Pizzaz, Rose Red
Stamps: (SU) Madison Avenue (SAB '13), Lovely Letters Alphabet,  Petite Pairs, Amy R - Birthday Sentiments
Punches and Dies: (SU) Labels Collection Framelits, Fun Flowers Bigz L Die, Scallop Circles in 2 3/8", 1 1/4" and 7/8", Circles in sizes 3/4", 1" and 1 1/4", SU Needlepoint EF, Memory Box Numbers Die
Other bits: LOTS of dimensionals, Vintage Faceted Buttons, Double sided tape.

Lynda xx


Monday, March 21, 2011

Packing it.......

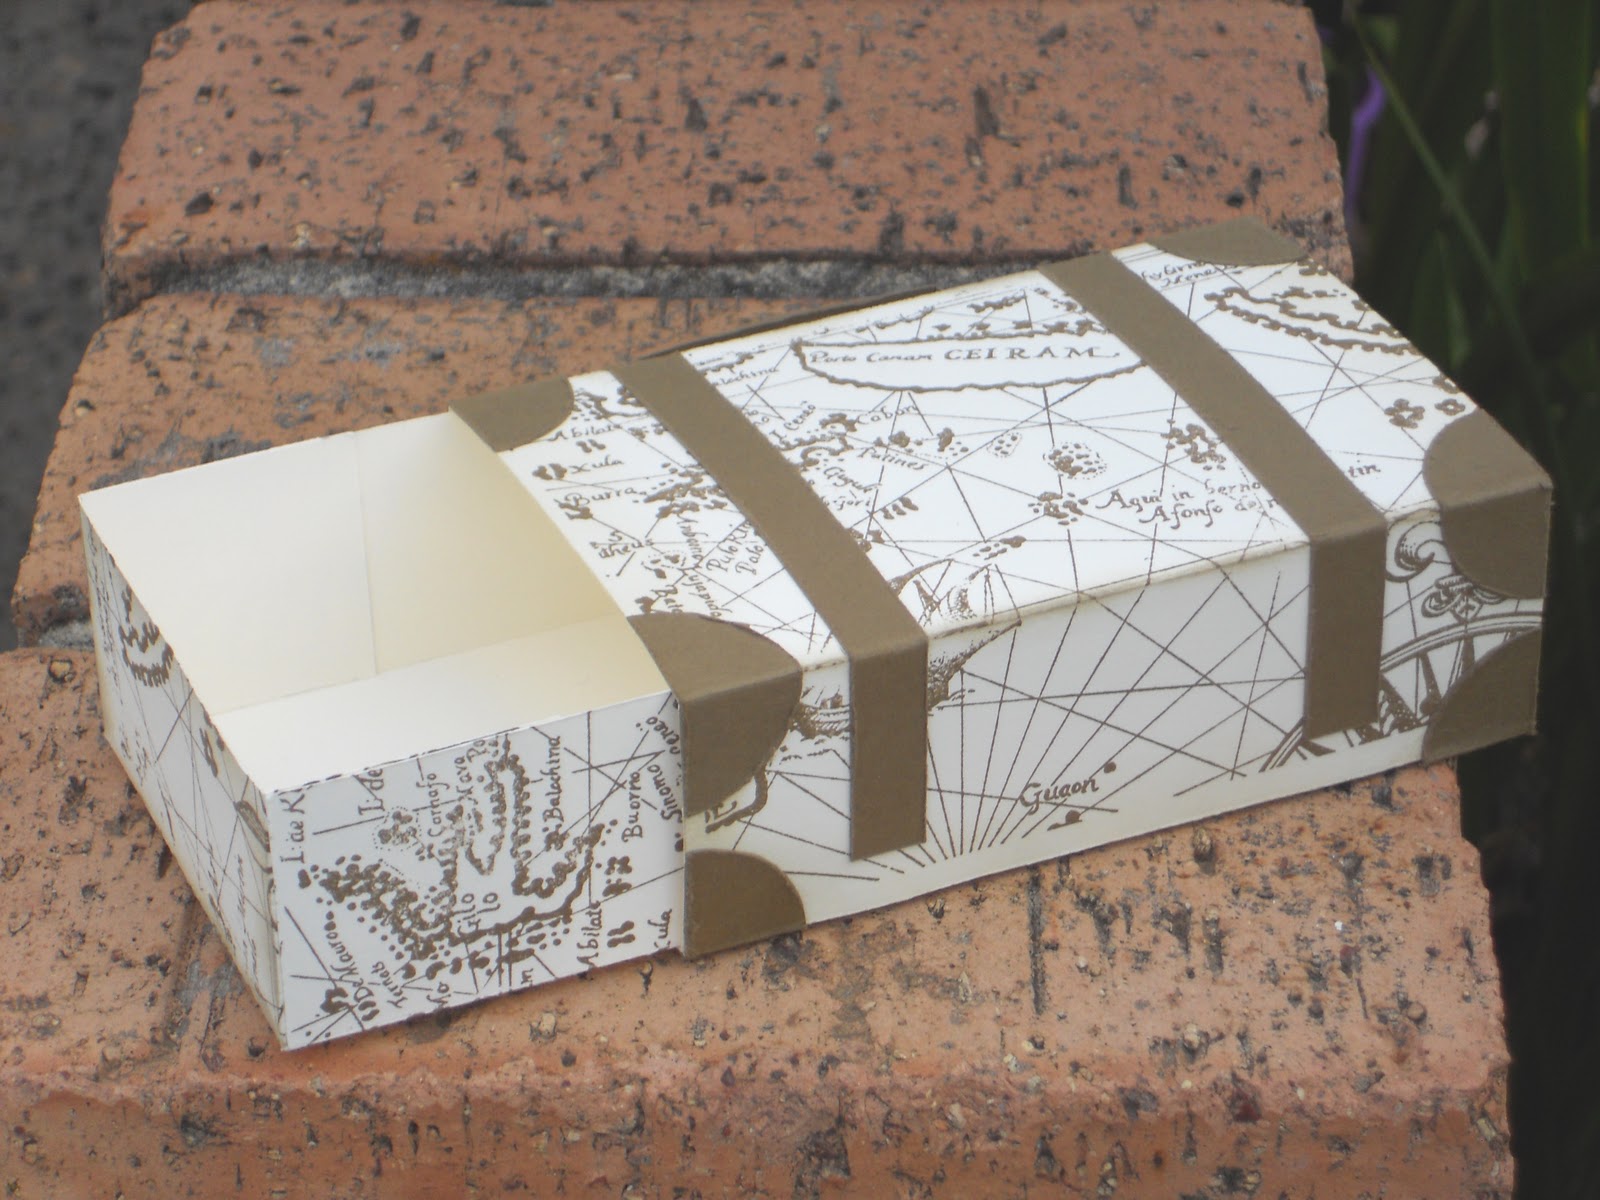
Anyone who knows me well, knows I love boxes. I love to make them, giving gifts in them and the smile that they bring. Kerry Bunting showcased a cute-to-boot box here not so long ago. I immediately knew what had to be done (apart from make one that is). I have had a BGSin my hoard for such a long time....circa 1998 SU called World Map and it is great for male cards. Having said that...this is the 1st time I have used it, having owned it for 18 months...but shhhhhhh...OK!!!

I wanted to try and capture the look of one of those old suitcases that you see on the carousel at the airport that has been around the world a couple of times. This is what I came up with.......


I think the BGS worked a treat!!! I also stamped the sides of the inset too to complete the look.


I distressed and sponged all the edges of the straps and circles and finished it off with a couple of pewter brads. Did I also mention that it holds 6 Ferrero Rocher chocolates?????


Oh yeah...and when made properly....the straps do go ALL the way around the bag!!! The tutorial for it can be found here. You may have to hit the "translate" button to get the English version.
 
I again wish to say a sincere thank you for all the well wishes and enquiries as to my pesky neck. For those of you who did not catch up...the Neurologist has said I can RETUEN to crafting (BIG happy dance there), but steady as she goes and I have to have an MRI later next month. It's GOOD to be crafting again.
 
Stuff used:
CS: (SU) Very Vanilla, Soft Suede,
Ink: (SU) Soft Suede
Stamps: (SU) World Map BGS (1998 SU)
Other bits: Pewter Brads, 1 1/4" circle punch
 
Lynda xx

Thursday, January 13, 2011

Bevvy of Boxes - #5

I have been at my job now nearly 16 months...yes time has flown. I love working with a larger staff...more opportunity to create havoc!! Running this well oiled machine is a fantastic Practice Manager - Judy. She is the QUEEN of multitasking, Mum, trouble shooter, confidant, negotiator and all round FAB lady. I managed to suss out when her birthday was and I wanted to make something special for her. I had seen this Top Note Die box on SCS here. I wanted to bust out something a little different and In my file I had a Vintage Vogue card I has seen here that I liked very much. I think it was the colour combination that attracted me first. Also helped that Judy like blue!!

I did change the card up a little bit to co-ordinate with the box, but kept the colour scheme the same. Here's the finished box..


Front and side.....


You may notice the Reverse Masking on the top of the box. I used the negative from the Nesties Labels 8 and sponged it in Whisper White Craft Ink to almost give a faux shadow....I love the effect. I even used a BUTTON!!! I think it is the very first time I have used a button as an embellishment. It covered the join nicely on the double layered ribbon. So I took it one step further. I changed up the card to keep the Labels 8 theme going.


On the original card they had used a Curly Label punch, but once again I reverse masked the Nestabilitles Labels 8, and also added some leaves and used half pearls instead of brads. It turned out better than I had hoped. I had never reverse masked at all before, but I think I will definitely do a LOT more of it.

The box held Judy's favourite indulgance....dark chocolate...and a couple of milk chockies for later on of course!! To complete the look I stamped a plain white paper bag. It look good I think all together. This co-ordination thing has some merit!!


These Top Note boxes are small but I am aware that there are different sized versions around. Judy DID love her pressie and managed to keep (most) of the chocolate from her kids. Give these wee boxes a try...they are very easy and a LOT of fun to make. Perfect size to hold diamond things perhaps girls???

Stuff Used:
CS: (SU) Crumb Cake, Whisper White, Old Olive
Ink: (SU) Rich Razzleberry, Bashful Blue, Whisper White Craft Ink, Versamark
Stamps: (SU) Vintage Vogue, Lovely Letters, Amy R "Birthday Sentiments"
Other bits: (SU) Sizzix Little Leaves Die, Dimensionals, Designer Buttons - Sherbert, Mini Glue Dots, Spellbinders Nestabilities Labels 8 (many of the sizes), Burgandy Grosgrain and Light Blue organdy ribbon fm Alice's, Blue Satin ribbon fm Big W, 1/2 pearls fm stash

Lynda xx


Tuesday, October 26, 2010

Frankie....the new man in my life!!!!

One of the things I love to do is share the fun a joy of papercraft with anyone who'll listen. I am lucky enough to share from time to time projects with the After Care Kids at my children's school. One vacation care I did some Halloween projects with about 50 children, but this time around...it was only 30....but still they love the Halloween stuff. The children range from K-6...so I have to have a project that will keep all ages interested. I recalled blurfing sometime back these FAB Halloween boxes that were done by Nicole Derendorf here and here.

Here is what I created, based on Nicole's boxes that she made.....meet Frankie!!


Due to the varying ages of the kids, I premade the box part of it, but the cut out the shape of the face, hair (they all cut their own fringe design), put the eyes together (and they LOVED the bloodshot eye look) and of course the gruesome scars...LOL!!! Here are some pics of the kids being industrious and their finished products!!


 And finally I had to make a v v special mention of this wee chap....he is 6 and I was so very pleased (as was he) with what he had made!!!!


Thanks for stopping by and sharing in this fun and mayhem!!

Stuff used:
CS: On my one (SU Old Olive, WW and Black). The School kids used Leapfrog and Leaf Green Bazzil CS, Optix Black, White and Pink CS and Paper
Ink: My Frankie - SO old Olive
Other bits: Glue, Double sided tape, Gold Stubbie brads, (all supplies for the kid's Frankie Boxes fm Alice's) Red and black Textas

Lynda xx


Tuesday, October 12, 2010

A Bevvy of Boxes - #4

The delightful Jenny Hayward recently had a post on a thing called a Boxy Bag. Now I LOVE making things to hold goodies....so I took up the challenge to make one and see what I could come up with.

Miss 6's 1st class teacher (who was also the teacher of Master of Cool (now 10)in the same grade) had a birthday...in September!!!!!! She is a delightful lady and so nurturing to the children, so I wanted to do something unique for her. A Boxy Bag was a good place to start. I also recently acquired "A rose is a Rose" set, which is sadly now retired. I found this card on SCS and I used it as a starting point. Now the large rose from this set is too big for the boxy bag...and I had the brainwave of miniturising the card on the bag to co-ordinate it. This is the gift set....


The card.....


Up close and up on dimensionals


And the sentiment....


The Boxy Bag front......and back......


 And side.......


It held 2 Robert Timms Coffee Bags and 4 Twinnings Herbal Tea Bags (for when you need to come down off the caffeine high....LOL!!) It was all finished off with a small box of Lindt Chocolates and I stamped a white gift bag with the rose and leaf to tie everything together.


I am liking this co-ordination thingy a lot and will be back later with another couple of co-ordinated things I have done. Thanks for enduring this post till the end.

Thanks also for popping by.

Stuff used:
Card: (SU) Riding Hood Red, Kiwi Kiss, Whisper White, Bella Rose DSP (now ret....sniff!!)
Ink: (SU) Riding Hood Red, Pink Pirouette, Kiwi Kiss
Stamps: (SU) A Rose is a Rose, En Francais BGS, Sincere Salutations, Fresh Cuts
Punches: (SU) Scallop Oval, Large Oval and Small Oval Punch, Horizontal Slot Punch
Odd Bits: Dimensionals, Red Grosgrain ribbon fm Alice's

Lynda xx

Friday, October 8, 2010

A Bevvy of Boxes - #3

"With a little help from my Friends" is a FAB song and is pertinent for this post. Kerry Bunting as I previously mentioned is a magical friend and I was blessed to receive this a short time back. (Sorry Kez that I have not posted it here yet!!) It is beautiful and takes pride of place on my table.
The birthday bonanza of Sept continued with niece...Miss 15 (the day before my son's b'day). Oh the agony of it all!!! A quick call to her Mum and all she wanted was bangles....EASY!! With such a basic gift it needed spectacular packaging. Now I am NEVER one to bite off more than I can chew (yeah right) and had images of co-ordinated cards and boxes, but sadly time ran out. I looked up and saw my little draw from Kez,...and a MASSIVE lightbulb came on.....a combo effort. Card and box in ONE!!! An e mail later and some information and I was on my way. Kez based her easel draw box on a template from Liam Pucher. Liam is SUPER talented in 3D paper projects. Take a look round her blog if you have not before. It is amazing.

(Sorry to keep rambling) I wanted to use the devine Miss Anya Collection stamps that have sadly sat neglected and unused since I purchased them (a long time ago!!) These 3 savvy young gals are perfect for tweens and teens. Rather than colouring the whole image I paper pierced some of it. This was the result..


and this is how she looked completed.....


I bundled her up with some Grosgrain Ribbon as wrapping....


Then.......when she took the ribbon off.......


I was sooooooooooooooooo happy with the result that a (somewhat sad but enthusiastic) happy dance was undertaken. It looked so pretty with the bangles in it!!


The card was a very narrow panel at the back of the easel which cannot be seen when opened, but is there as a special reminder. Here it is from the side and close ups of the delightful draw handle and the sentiment. Given that the inside of the draw gleamed...Happy Birthday did not seem right. "Sparkle" fitted the bill perfectly.


Thanks so very much for enduring this post to the end. The crafting community is such a wonderful and caring group, makes you feel good just to be a part of it.

Stuff used:
CS: (SU) Rich Razzleberry, Old Olive, Orchid Opulence, Whisper White, Watercolour Paper, Cottage Wall DSP.
Ink: (SU) Rich Razzleberry, Black Stazon
Stamps: (SU) Warm Words, Miss Anya Collection (The Greeting Farm)
Punches: (SU) Scallop Oval and Large Oval punch
Other bits: Nestabilities Oval and Scallop Ovals, Faber-Castell Watercolour Pencils, Lyra Watercolour Crayons, SU Dimensionals, handle fm Kez's local craft haunt, Kaiser Clear Rhinestones

Lynda xx