Showing posts with label Punch Art. Show all posts

Tuesday, June 11, 2013

Cheeky Monkey !!!

Morning all,

For those in Australia, I hope you all had a wonderful Queen's Birthday long weekend. I hope you all got a little inky and creative.

Last Monday (3rd June) My Miss 8 became Miss 9. We have (endured) her meticulously crossed off  30 day count down to her special day. She is growing into a very cheeky little one (of course totally unaware as to where she acquired that trait from!), hence the inspiration for this ensemble.

I also took a lot of inspiration from Di Barnes with her card here. This is the card I created for her.......
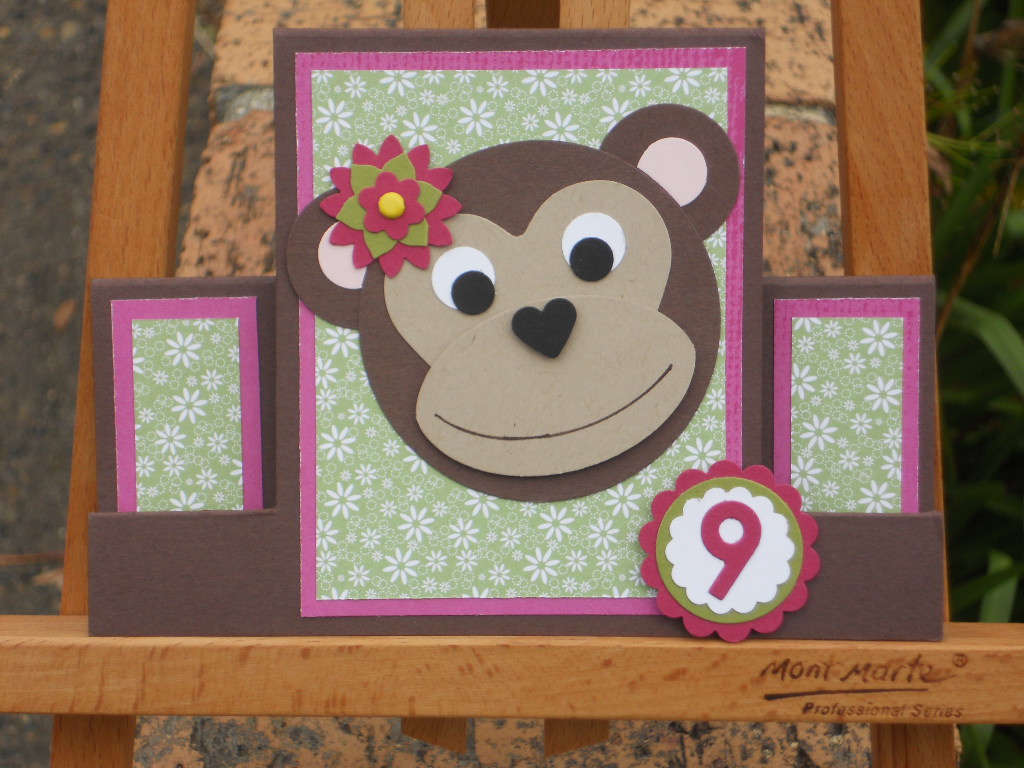

It is a centre step style card. I based it in a tutorial from SCS here but continued all the cuts to the back as well (hope that makes sense?) It stands so nicely.....

 
I coupled her card with a matching box made with the Fancy Favour Box Die (which I LOVE!!!)
 
 
The box was the same front and back and I used the flower motif on the sides to secure the handle.
 
 
Now I can hear you ask...."what is in the wee white bag??" Well, my Bestie Tracey, she makes children's jewellery. She has an Etsy shop here and you can also find her on Facebook under Berry-licious. Whilst the 2 of us were at Craft Camp this year I asked her to make a special set for Miss 9 and this is what she came up with.......
 
 
Here is the card and box together.......
 
 
Thanks so much for popping by. I am hoping my very first "pre-order" for the new 2013/14 catalogue arrives today or at the latest Thurs. There are SOOOOOOO many delicious things to see and share with you.
 
Stuff used:
CS: (SU) Chocolate Chip, Crumb Cake, Pretty in Pink, Basic Black, Whisper White, Purely Pomegranate (ret), Holiday Treasures DSP (ret), unknown SU Old Olive DSP
Stamps: NONE
Punches: As per Dawn Olchefske's tute here for the monkey - however I did not have the face punch so I used a Carla Craft CP21 Heart instead and a CP1 heart for the nose, 1 1/4" Scallop Circle,1" circle, 7/8" Scallop Circle, 1/2" Circle, Boho Blossoms Punch, Carla Craft CP1 Vinca B punch, Memory Box Numbers Die
Ink: (SU) Chocolate Chip SWM for the mouth.
Other Bits: LOTS of Dimensionals, SU Fancy Favour Box Die, Generic yellow Brads
 
Lynda xx


Friday, June 7, 2013

Punch Art Fun and Games......

Morning all.

Firstly, thank you all so much for your blog love and encouragement on my return to blogging. It was overwhelming.

Today, I am again combining a couple of projects done over the past couple of months that have a common theme. Today - Punch Art.

As most of you are aware, I was an avid punch artist before I discovered stamping, now I get to combine the two and make some fun creations.

Recently my DH's niece turned 2. I had seen this card on Andi Potler's blog and fell in love with it immediately. I had to do it for Pippa!! This is my version......

 
It went up so quickly and it is basically circles!!! It sits up nicely on dimensionals.....and the only Whisper White to be seen is the eyes!!!


Next two cards were done for a customer. They wanted a "girly robot" card for their niece and a "Russian" themed birthday card as they would be in Russia for the wife's birthday!!! God bless Google!!! This is what I found......

Girly Robot......again seen here on Andi Potler's blog.....

 
I did change a couple of things on Andi's punch list, but the majority are the same. The background of the robot is a FAB embossing folder by Cuttlebug called "Clockworks and was so perfect for this card. I also created a small "button" on the melon Mambo strip for a bit of fun. Each layer is separated by a dimensional so it is really squishy to push on.


Something I very rarely (and probably should do more of) is stamp the inside of my cards. The SU Clockworks set provided a good continuing theme for this card.


Lastly...the Babushka's were inspired by a Deb Fearns card seen here. This is my version of her card....
 
 
I used the punches that Deb listed, with the exception of the hair dos and the lips. The hair was achieved with (fm L - R) The mid portion of the old butterfly punch, the scallop border punch and the base of the heart punch. Here they are close up...


Now the mouth....I like to use everything.....and this is no exception. The mouth is the punch out scrap from the SU Pinking Heart Border Punch. It was PERFECT!!!
 
Thanks again for popping by and tolerating all the photos!! Two posts in a week is a good start to my new regime. It is all baby steps.
 
I am not going to list ALL the supplies used in these cards, but please, if you have any questions, please leave it in the comments and I will answer it for you.
 
Lynda xx


Wednesday, April 17, 2013

Some Small Piggy Smiles

Hi all.

Ever see a card and think I HAVE to do that....and then it takes forever to fin the right occasion to come around??? Well I found such a card...and such an occasion DID come up!!

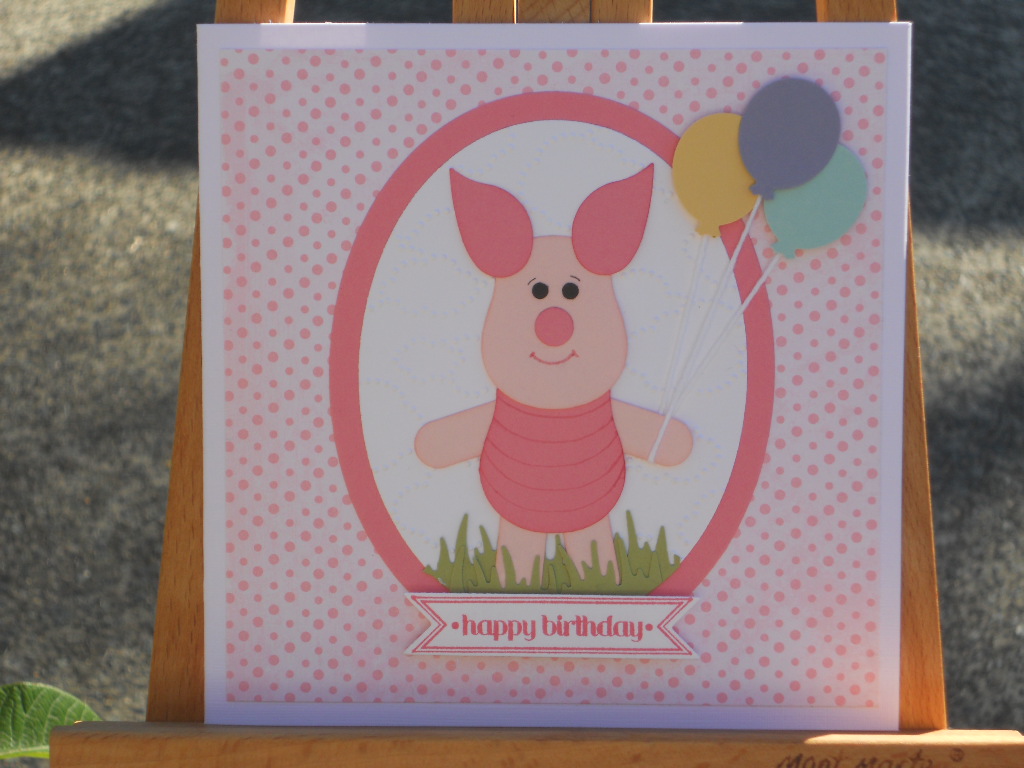
I was inspired by a couple of Piglet cards here and here. The one on Carla Scraps also came with a very handy tute, so I went from there. My GORJUS niece recently celebrated her 3rd birthday and so this was her card......

I found that everyone I shared this card with smiled, and that is the best thing ever!! I did change a couple of things in Carla's Tutorial in that I left Piglets Torso a single layer and drew on his "belly". This was done by centering and tracing around a "scrap" owl punch piece. I also embossed the white oval the with Cloudy Day EF....made such a difference.


The grass is done with the Martha Stewart Grass punch and I added the Itty Bitty Banner for the birthday.


To go with the card, I enclosed an UBER cute beaded bracelet/necklace and hair pin set made by my Bestie - Tracey. She is now selling sets like this and many more through e bay and Facebook under Berry-licious. She even does wee earrings too. They are so perfect for the up and coming young gal about town. Please check out her creations if you have the need for something special and unique foe a little princess.
 
 
Thanks for popping by. I so love reading all your comments and appreciate your taking the time to leave them.
 
Stuff used:
CS: (SU) Whisper White, Regal Rose, Pink Pirouette, Tea Party DSP (ret), Pear Pizzaz, Wisteria Wonder, So Saffron, Pool Party, Basic Black
Ink: (SU) Regal Rose, Pink Pirouette (also sponged on all Piglet pieces), Regal Rose SWM for mouth and belly lines
Stamps: (SU) Itty Bitty Banners
Dies and punches: (SU) Oval Framelits, Banner Framelits, Owl Punch, Bird Punch, Word Window Punch, Martha Stewart grass Punch, Carla Craft CP2 Balloon Punch and 1/8" circle punch
Other bits: SU Cloudy Day EF, Dimensionals, Double sided tape
 
Lynda xx


Saturday, March 30, 2013

Easter Bunny meets Easter Cow!!!

Hi all.

Firstly, I wanna wish all my readers all the very best for this Easter period. Here in Sydney we are having a mini Autumn heatwave (again) with temps hitting the high 20's to low 30's!!! (68F to 86F for those other than Celsius folk out there).

This year for the first time in a LONG time I am prepared for Easter. I do not buy my kids any eggs because by the time the grandparental bunny, The Aunty/Uncle Bunny and the Neighbour Bunny all make a stop....it gets a little ridiculous!!!! Sometimes to the point that we have Easter chocolate left over in September!!!

We have now 8 children in the villas around us ranging in age from 12-2. With this in mind....and so my 2 wee bunnies can drop their wee surprises off....I made these. They are made from the SU Mini Milk Carton Die (hence the Easter Cow reference!!!)

 
I had to take all the pics quickly as it was very hot in the sun and I did not want the contents to melt!!! Here it is close up at the front...and a small surprise at the back!!!!
 
 
The one thing that did surprise me a lot is HOW MUCH chocolate these wee containers hold!!! Check this out.....

 
I also could not forget the Mum's at dance class. We natter every Thursday whilst our daughters are upstairs learning. I was inspired by the magical tutorial by Julie Davison here. I did change hers up a little in that I used a "punch art" face as opposed to a hand drawn one....I cannot free hand well at all!!!! This is what they received.....
 
 
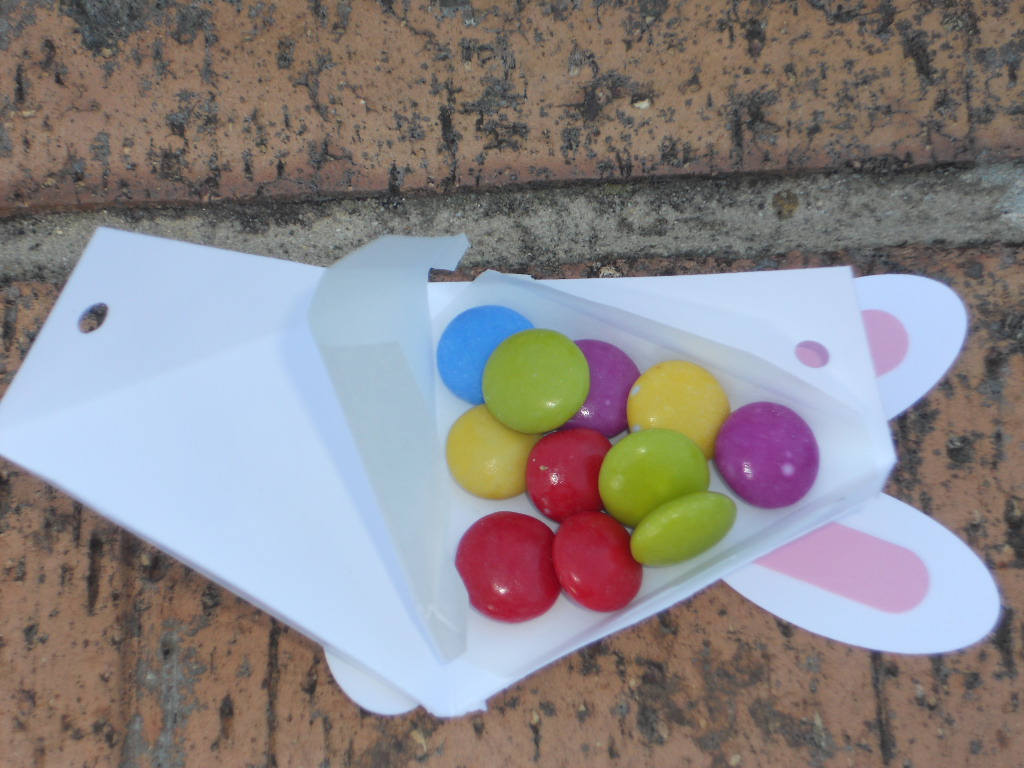
I did make the bunny too. It holds quite a few Smarties.
 
 
Here are their faces close up......
 
 
Sorry about some of the darker pics. Sometimes the shade was a better option!!!
 
Thanks for popping by and whatever your faith, belief or following, may the coming days provide with you fun, friends and laughter too.
 
Stuff used:
CS: Whisper White, Pretty In Pink, Daffodil Delight, Tangerine Tango, Many retired DSPs in the milk cartons
Ink: Black SWM, White Gel Pen
Punches: Milk Carton Bunny - Head 1 1/4" circle, Ears - Blossom Builder Punch, Nose - Owl Punch, Muzzle and White Mouth - 1/2" circle, Pink mouth and eyes - 1/4" circle, Tail - Boho Blossom Punch
                Triangle Bunny - Face - as per milk carton bunny except the eyes are the MEDIUM circle fm the Owl Punch, Ears - SU Large Oval Punch and Word Window Punch, Paws - SU small oval punch
                Triangle Chick - eyes - 1/4" circle, SU 2 3/8" Scallop Circle, Beak - Carla Craft CP2 square Punch
Other Bits: Tangerine Tango ribbon (Sycamore St Bundle fm SAB '13), Non SU Pink Satin ribbon, White Crochet cotton to tie the milk cartons, COPIOUS amounts of small chocolate!!!!
 
Lynda xx
 

Tuesday, February 12, 2013

Walk Like an Egyptian.......

Morning all.

Apologies now to all for putting the idea of the song in your heads....but when you see the card...you will get the title!!!

I was asked to make a card by one of the doctors at work (yes...he is one of my best customers!!). He was playing the part of Best Man for 2 friends of his that were getting married. To paraphrase him, I was given the brief of......"They are both Egyptian, doctors and they have a VERY good sense of humour. Make me an Egyptian themed wedding card....and take the mickey out if it if you wish!!" How could I say no??

Once again, Google cooped a real work out as to what ancient Egyptians wore when getting married and the common theme was gold, turquoise and a LOT of jewellery....so the seeds were sewn. I wanted to make the couple with the SU Owl Punch and after much trial and error, This was the final result........

 
Needless to say, there is a LOT of punch art and a lot of sponging on this card. The camel was CASED from Ellen Kemper here. I did however downsize the camel (used Lg Oval punch instead of Wide Oval Punch, Small oval replacing large etc) as her camel was slightly too big for my card. The blanket and hump for the camel was achieved by cutting out the smallest Fancy Flower Framelit and then punching it to the "hump" shape with the small oval punch. The belly tie was a left over petal cut straight to the centre. Does that make sense? The sand beneath was sponged using a post it as a mask. Given that the newlyweds had no card to drive off into the sunset in, I hung the "Just married" sign off the back off the camel!! It was generated from the computer.


 The bride and the groom were another challenge altogether! here they are close up......

 
The groom's Pharaoh-like hat is the chest of the owl turned upside-down. I used a wide oval punch and a 1"circle punch to achieve the Cleopatra-esque hair. The eyes ideally would have been almond shaped, but hard to get even. I ran a black SWM around the edge for the "eye liner" look.
 
Finally (and thanks for bearing with me) the pyramid. I masked off the section for the pyramid and lightly sponged it with River Rock ink. Then, to get the "brick" look, I carefully cut with a craft knife bricks from the sticky part, Put that across the top, and then sponged each layer in Crumb Cake ink row by row...offsetting as I went.
 
 
I received some feedback about a week later. Apparently the card was a hit (apparently I am also to expect a phone call form the bride when she is back from her honeymoon)!! The doctor that ordered it LOVED it and the bride and groom got such a giggle
 
Thanks for enduring a detailed post. I will try to list all things used, but if you feel I have missed something or have a question please leave it in the comments with an e mail contact and I will get back to you. Thanks for popping by.
 
Stuff used:
CS: (SU) Whisper White, Close to Cocoa (ret), Basic Black, Crumb Cake, Soft Suede,, Pumpkin Pie Textured Taken with Teal (ret), non SU brushed gold CS, turquoise embossed paper and groom's chest piece were scrap donations from another bride's invitation!!
Ink: (SU) Baja Breeze (sky), So Saffron and Sahara Sand (sand), River Rock, Crumb Cake, Black SWM
Stamps: NONE!!!!
Punches/Dies: SU Owl Punch, Large/small/extra small oval punches, 1/4", 1/2" circle punches, Boho Blossom Punch (camel's hair tuft), Word Window Punch, Fancy Flower Framelit dies
Other Bits: Latte 1/2 pearls from stash, Post it notes (lots of them), Dimensionals, Metallic Gold Cord
 
Lynda xx
 

Saturday, February 2, 2013

Perfect Punch Art Pooch

Hi all,

Once again, apologies for the length of time in between posts. There has been MUCH going on under our roof. The children went back to school this week (Miss 8 into year 4 and Master 12 started HIGH SCHOOL!!!!!) where does the time go....seriously??

Now I have also been dropping some hints recently about some BIG NEWS that was happening....and well finally it came to be (and for all those incredibly funny folks out there NO I am not pregnant!!) On the 23rd of January, I (finally) signed up and I am now a Stampin' Up Demonstrator!!! I have had to read a lot, learn much more about my computer 9than perhaps I would have liked to) and I have had the UBER patient Angela Sargeant as my mentor and guide. I cannot thank her enough for helping me through all the oopses and lingo.

Now....onto the card. Also in the time since last posting, a friend of mine had a little boy who turned 1!! Such an occasion cannot go by unheralded. I have had this card in my CASE file for some time and thought it perfect for the birthday boy. It is punch art, which of course I LOVE, so it was an easy decision. I stepped up certain elements of the card and this is what I came up with.....(you can click on the image to make it bigger)

 
I just think punches are the best. Whilst I enjoy my stamping, punch art is what I did before I stamped and it is something I can combine with stamping with ease. The other huge effort in this card is that I used all brights...with the exception of pooch of course!!
I stamped the large banner from Pennant Parade in the same colour as the "flag" and then spaced them out across the card. Light bulb moment came when I realised that the birthday boy's name had 4 letters....so I cut out the letters and the #1 in gold glitter board and snap...easy peasy. A couple of dimensionals here and there and it was done.
 
 
Thanks for popping by, especially if you are visiting via Beth Beard's blog. I would love to hear your thoughts and comments on this card. Beth and I got to know each other via a crafting forum and she has been an amazing friend and supported, even though we have never met (given she is in the USA and I am here is Australia. It is a cool near 25000kms between us, if you believe Google Maps here. I hope you can drop by from time to time.
 
Stuff Used:
CS:(SU) Pacific Point, Whisper White, Tangerine Tango, Rich Razzleberry, Daffodil Delight, Real Red, Crumb Cake, Chocolate Chip, Basic Black
Ink: (SU) Rich Razzleberry, Pacific Point, Daffodil Delight, Real Red, Crumb Cake, Chocolate
Stamps: (SU) Pennant Parade
Punches: (SU)2/12 inch Circle, Blossom Builder Punch, Pennant Builder Punch, Ornament Punch, Owl Punch (small circles for eyes)
Other bits: SU Chevron EF, Cuttlebug Swiss Dots EF, Cuttlebug Olivia Alphabet, Ice Cream Parlour Buttons (ret), Gold Glitter CS
 
Lynda xx


Sunday, January 20, 2013

The Lion Sleeps tonight.......

Hi all.

Woo hoo...it is now cool in Sydney. For those of you overseas, on Friday it hit 45.6 degs C (that's 114 degs F) and we sweltered!!! Friday night a cool change came through and all was slightly better with the world. Sadly however with such extreme temps, bush fires broke out all around NSW and Vic. Our thoughts go out to all fighting the fires and those who have battled.

I still have one last batch of Christmas cards to share, but I thought I would give you a break and share something slightly more fun and goes back to my Punch Art roots. A patient of mine asked if I could create a card for her niece (aged 24) who was going to Africa to volunteer for nearly a year. Her sister had found an appropriate card with a hippo on it, but alas, she could not give 2 of the same card!!!

So, with the animal theme in mind....I went to work. I have a MASSIVE file of punch art animals and card ideas on my laptop. I was inspired by the cards here, here and here. The lion is indeed an animal of Africa, but I loved the idea of it peeking through a window or similar as in the 1st card. I based my Lion on the one from Jackie Topa's Cute Critters here. So...I combined all ideas and came up with this......


I will admit to a small happy dance being under taken when this was finished as it turned out MUCH better than expected!!

The lion is based around simple circles and the Blossom Punch. ALL pieces were sponged in the same colour as the CS which really gave some dimension. How can you not smile at a face this cute??


The sentiment is from Teeny Tiny Sentiments. I also stamped the leaves from Summer Silhouettes in Versamark on the pink to fill in some blankness (if there is such a word. The "window" is just a series of strips run through a woodgrain EF and then layered.

Thanks for popping by today and I hope this card has made you smile. I will TRY and list all the punches used, but if you have a questions, leave it for me in the comments and I will get back to you.

Stuff Used:
CS: (SU) More Mustard, Soft Suede, Real Red, Whisper White, Basic Black, Pretty In Pink, Pink Pirouette, Certainly Celery, Barely Banana (ret), Textured White Linen White CS (Non SU)
Ink: (SU) More Mustard, Soft Suede, Soft Suede SWM, Versamark, White Gel Pen
Stamps: (SU) Teeny Tiny Sentiments, Summer Silhouettes
Punches: (SU) Blossom Punch, Boho Blossoms, XL Bird Punch, 1 3/4" circle Punch, 3/4" Circle Punch, 1/2" Circle Punch, 1/4" Circle Punch, Modern Label Punch, Word Window Punch, Carla Craft CP8 heart punch, Scallop Oval Punch, Carla Craft Vinca A Punch, Carla Craft 1/8" Circle Punch
Other Bits: Darice Woodgrain EF, Dimensionals

Lynda xx

Thursday, December 20, 2012

From a Topper to........

Afternoon all,
 
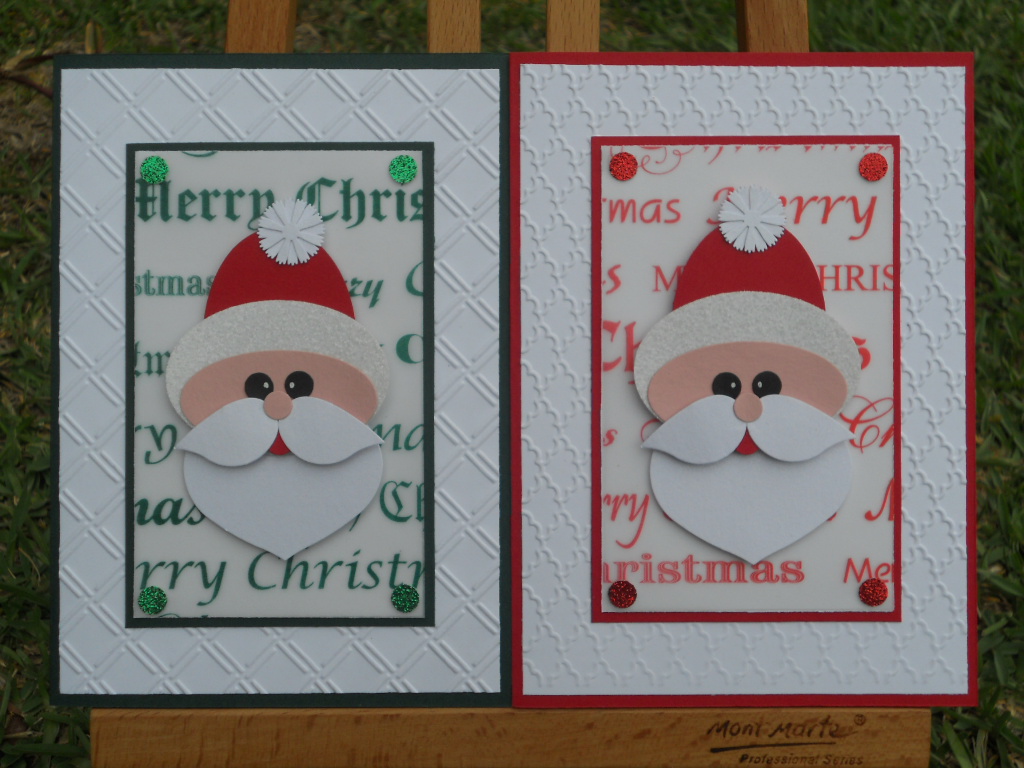
Last year here I had some fun with some punch art. This year I thought I would put these cute guys on some Christmas cards. I also gave wee Rudolph a makeover and updated his antlers. I used the Snow Flurry die and used 2 of the "arms" of the snowflake for the antlers. Here is what I came up with.....
 
 
These (I think anyhow) are really cute. Each of them have a bit of bling as seen here.....
 
 
.....and here.....
 
 
The punch art critters are sitting on a WW matt and vellum overlay with "Merry Christmas" in various fonts, hence no need for a sentiment. A really easy card. A little texture on the large white matt and all done and dusted.
 
The "stuff used" for the punches is basically the same with the exception of the reindeer antlers.
 
Thanks for popping by.
 
E mail update....still NO ACCESS....turns out Microsoft were sending access codes to the e mail of the blocked account....DER!!!!!! So...once again I wait 3-5 working days...which PS will be Christmas...and I am really not overly confident. To all those blogs of whom I subscribe, I promise to comment really soon!!!
 
Stuff used:
CS: (SU) Real Red, Handsome Hunter (ret), Whisper White, Basic Black, Chocolate Chip. Red, White, Green Glimmer CS and Merry Christmas Vellum all fm Alice's.
Punches: See linked post at beginning, plus Snow Flurry Bigz Die (SU), Carla Craft 3/16" circle punch
Other Bits: Dimensionals, Glue Dots
Embossing Folders: (SU) Fancy Fan EF, Cuttlebug Wicker Weave and African Weave EFs
 
Lynda xx


Thursday, November 29, 2012

Angry Bird for Pre Teen!!!

Morning all.
 
FINALLY....with much patience I have rectified my issue with Picasa. I have (sadly) deleted a lot of earlier pictures from my blog. If you go to find something and the picture you seek is not there, Please do not hesitate to leave me a comment or drop me a line and I can forward the picture to you. All the information and "Stuff used" is still all there.
 
Now for today's contribution......
 
Master 12 was off to a laser tag birthday party not that long ago. The birthday boy was one of his baseball team mates. Now whilst I am at my son's game, I am known for having my craft bag not that far from me and am always putting something together. The birthday boy caught a glimpse of my previous Angry Birds cards and thought they were "cool". From a near 12yom that is high praise indeed. I got the inspiration for his card from here by the very talented Andi Potler. This is my version of her card......
 
 
It is so very simple. The road is just strips of black and white CS, a yellow sign and a punched angry bird and there you go!! Now the birthday boy is also an avid reader, so naturally I made him a matching bookmark to go with the books we bought him as a gift. I got the idea for the bookmarks here.
 
 
Here are the card and bookmark together......
 
 
I procrastinated over whether to put his name on the bookmark, but glad I did. Apparently it is not too dorky (phew).
 
Thanks for popping by and for your patience during the whole picture debacle. I promise to share some Festive fun very soon.
 
Stuff used:
CS: (SU) Gumball Green, Whisper White, Basic Black, Poppy Parade (ret), Peach Parfait (ret), Yellow textured Bazzil
Ink: (SU) Poppy Parade (ret)
Stamps: Clear generic happy birthday fm stash
Punches and Dies: (SU) 2 Tags Die, 1 3/4 inch circle, Scallop Circle Punch, Horizontal Slot Punch, XL Owl Punch (eyes), CM 1 3/8 circle Punch, Carla Craft CP2 Daisy punch, 1/4 inch circle, Cuttlebug Olivia Alphabet
 
Lynda xx


Saturday, November 17, 2012

Expanding My Cultural Horizons - Diwali II

Morning all.

Today I am sharing the 2nd design of cards I made for Diwali. Again, they use a lot of bright colours, but this time these cards are based around the small candles and the beautiful shapes they come in.

The first cards - well...sometimes it pays to be a hoarder!!! Many years ago (2009 I think) SU had a DSP called Bali Breeze. One of the designs reminded me of the wisps of smoke coming off a flame, so I went with it. So glad I did.....


The bases are Wide Oval Punches and then the DSP is punched with a Butterfly Punch to make the curves!! The flames were another "accidental" find. I used the "flame" shaped die from the Holiday Ornaments Die set and then double die cut it...does that make sense? The red part of the flame is the heel from the Stocking Builder Punch. Aren't punches wonderful?? I also sponged all the flame edges.


The 2nd card was based around the same layout, but one was in portrait and the other in landscape. I also had another light bulb "flame" idea. For these I used the Daydream Medallion stamp set and Floral Frames Framelits. I cut the stamped and die cut images in half. On the Poppy one, it reminds me of a chandelier.

 
They are so pretty layered all together.


Now for that light bulb....the flames were this time done with the Blossom Petals Builder Punch. The end result was a beautiful elongated flame with a delicate tip.


The candle bases were basically the same as the ones above, except this time I tried to do one with the top of a heart punch and the other was part of 2 circles cut into the oval.
 
            Heart                                                                                                                     Circles


Here are the last batch of cards all together.
 
 
I hope you have enjoyed this out-of-my-comfort zone Diwali cards. I learnt so much whilst reaching these cards. Both ladies that these cards were for were over the moon with the cards and have sent them home to India to their families to let them know they are also celebrating here in Australia.
 
Also...I must also say a BIG thank you to Angela Sargeant again for lending me this wonderful stamp set!!
 
Thanks again for popping by.
 
Stuff Used:
CS: (SU) Tempting Turquoise, Poppy Parade (ret), Summer Starfruit, Whisper White, Rose Red, So Saffron,  Bali Breeze DSP (LONG ret....LOL!!)
Ink: (SU) Tempting Turquoise, Summer Starfruit, Poppy Parade (ret), Wild Wasabi, So Saffron and Pumpkin Pie (sponging flame)
Stamps: (SU) Daydream Medallions
Punches and Dies: (SU) Holiday Ornament Die Set, Floral Frames Framelits, Window Framelits,Blossom Petals Builder Punch, Stocking Builder Punch, Butterfly Punch (ret), Carla Craft CP2 1" Circle Punch, Carla Craft CP21 Heart Punch
Embossing Folder: SU Fancy Fan Folder
Other Bits: Dimensionals, Sponging, Clear Rhinestones fm stash
 
Lynda xx