Showing posts with label Decorative Label Punch. Show all posts

Monday, September 3, 2012

Hoot of a Card!!!

Morning all and welcome to Spring!!!! (insert wee happy dance and beaming grin!!)
 
Before I share today's card with you I have to send out a MASSIVE thank you to Katie Ridden for the inspiration. Since birth of bubba #2....most of her creative works are shared on Facebook here. We met a couple of years back on a creative forum...and our daft senses of humour were a PERFECT match.
 
Katie's creations are brilliant, and with 2 younguns under 5...she has her finger on the pulse of all things kiddy related. i made a particular mental note when one day she sat down and created these.....
 

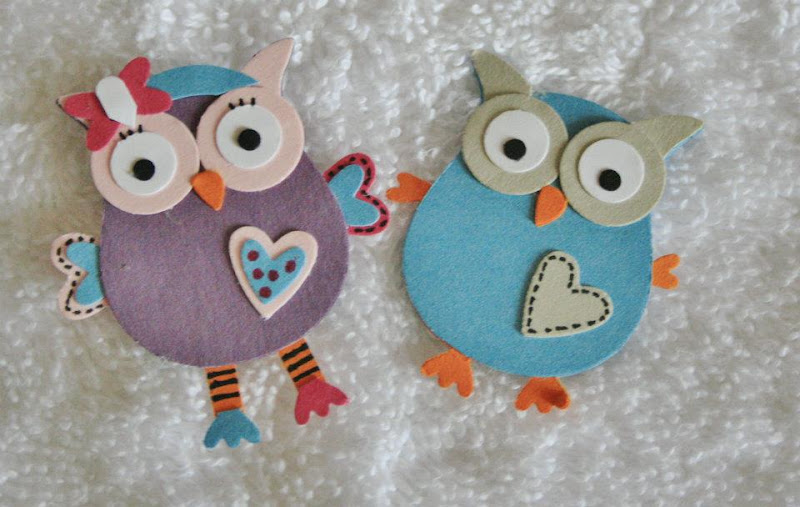
Now for those not all knowing in the "real young-uns" area....the above are punch art creations of Hootabelle and Hoot the Owl. Hoot has his own programme on the ABC here in Australia (Giggle and Hoot).

Now (again) one of the doctors at work, well his niece was turning 1 and she is MAD about all things Hoot....to the point where her party was totally Hoot themed!!! He asked if I could make her a special card. I immediately thought of Katie's effort. This is what I came up with.....


There was a lot of research into all things Hoot. He has a special set of drawers in his house and this is what I based the card around. Here are a couple of close ups of the card....


I tried to get the drawers as close to authentic as possible using EF's and some checkered DSP with a slight marker adjustment to make the squares bigger. I stamped the Weathered BGS in Versamark to add a bit of texture to all the brown space.
 
Under the "Happy Birthday" there is the "splat" from Extreme Elements in very light pink. (sorry about the dodgy pic). The card is known as a Side Step card. There are many tutorials around, but I used this one here by Jackie Topa.
 
 
When I gave it to the doctor in question, I was MOST stunned and shocked by his reaction. I am not really THAT tech savvy (he is about a decade younger than myself and STREAKS ahead!) He snapped a pic on his iPhone, sent it to his fiancee, she sent a text back and he came in whilst I was with a patient with HER reaction!! Thankfully the patient was a regular and has a brilliant sense of humour.
 
Now I have used a lot of stamp sets and punches here. I will try to list them all, but if you have any questions, please ask and I will get back to you. Thanks for popping by and making to the end of this post.
 
Stuff Used:
CS: (SU) Soft Suede, Whisper White, Pool Party, Orchid Opulence (ret) Pumpkin Pie, Pink Pirouette, Sahara Sand, Riding Hood Red, SU DSP (can't recall name), Optix Purple and Turquoise
Ink: (SU) Pink Pirouette, Versamark, Tempting Turquoise and Melon Mambo SWMs
Stamps: (SU) Weathered BGS, Extreme Elements, Birthday Wish
Punches: (SU) XL Owl Punch, Decorative Label Punch, Carla Craft CP8 Heart Punch, Carla Craft CP1 punch
Other Bits: Cuttlebug Olivia Alphabet, Buttons fm Big W, Mini Silver Brads (Kaiser I think), 0.05mm black felt tip for stitching, Dimensionals, Glue Dots
 
Lynda xx


Thursday, July 5, 2012

Craft Camp - #3

Morning all.

I can now post this card, as the person it was intended for was married this weekend past. Truth be told, I only recall vague parts of this card going together as (1)...it was done very late on the Saturday night of Craft Camp and (2)...I was more than slightly hypoglycemic when putting it together!!! On the upside....I was mote than happy with the outcome.

I knew that the colour scheme for the wedding was all vintage tones and I wanted the card to reflect this. I was inspired by the layout I saw here. I loved the idea of the hearts and birds. So...with that in mind, this is what I came up with......


There are lots of little things that are in this card that need a hi-lighted mention. The background is stamped with the largest stamp from "Style Beautiful"....a set that I have not pulled out in some time!! The hearts are actually White lace (yes shock horror.....I used LACE) and what is more shocking....I coloured it with a very light sponging in Tim Holtz Frayed Burlap to age it and make it fir the card. I was soooooooooooooo glad that Connie had these to sell at camp!!


As you can also see, on the bird I also carried through the large stamp to ass texture and interest. The DSP that was used for the Lace Border Punch was carried through onto the wings of the birds too.


Notice the different shape of the label? Believe it or not, it is actually the Decorative Label Punch. I got the idea from here at Debbie Henderson's blog.

I was so very happy with the vintage look of this card. I can only hope the bride and groom were too. I have a couple more weeks to wait and find out!!

Thanks for popping by.

Stuff used:
CS: (SU) Very Vanilla and Making Memories Paper Reverie - Brun Antique Dictionary DSP (#35856)
Ink: (SU) Soft Suede, Crumb Cake (stamped off), Tim Holtz - Frayed Burlap
Stamps: (SU) Style Beautiful, Petite Pairs
Punches: (SU) Lace Ribbon Border Punch, Decorative Label Punch, Word Window Punch, XL Bird Punch
Other Bits: Lace Appliques from Connie's Creative Scrapbooking, Dimensionals, Sepia Rhinestones from stash

Lynda xx

Sunday, February 19, 2012

Sail Away to 50!!

Good afternoon all.

My old boss (who I worked for in total for 10 years) recently celebrated an significant "0" birthday. Even though h is no longer my employer, he is still a good friend and I could not let the occasion go by without a card. one thing he is passionate about is sailing and the ocean, so it was an easy decision to make the card nautically themed.

Now I have forgotten where I found this card, and I cannot even credit the creator (sorry), but this is the card I took my inspiration from.....


This is the card I gave to my former boss.....


I kept the elements from the original of the boat, sentiment and self made DP, but I do not have a spritzer, so I stamped off my World Map BGS and used it instead. I also put the boat on dimensionals.


Now as you can see, I did not use a button (it was a masculine card after all) and I found a tutorial for the Sailor's Knot here. I got some twine from Michelle at The Stamp Spot and used it to do the knot. BTW.....SOOOOOOOOOOOOOOO happy with the result!! He is a chap that does not like a lot of fuss, so I hid his age on the inside font of the card and made a wee flag from the Pennant Parade set and used some more twine to "hoist it up the mast"!!

Thanks for popping by. I know my posts have been a tad irregular at present, but rest assured I have a lot more to share.....in between life in general!!

Stuff Used:
CS: (SU) Whisper White, Cherry Cobbler, Not Quite Navy
Ink: (SU) Not Quite Navy, Baja Breeze
Stamps: (SU) Sail Away (ret), World Map BGS (ret), Life Definitions (ret), Pennant Parade
Punches: (SU) Petite Pennants Builder Punch, Decorative Label Punch
Other bits: Twine fm The Stamp Spot, Dimensionals, Gold Numbers

Lynda xx

Tuesday, December 13, 2011

Christmas CASE - #2

A couple of weeks back I landed over at my friend's place with the soul intention of making Christmas Cards. I would like the record to reflect that I made 6 and she got 1 done, but in her defence, she did make a lot of owls too!!!

I think I am a SUCKER for Christmas stamp sets, due to the fact that when I packed up my stamps to go to her place, I actually had to leave SOME behind. One set I did take was "Tags Til Christmas". I got the inspiration for my card from this one on SCS.

Now still feeding my overwhelming desire to have no 2 cards the same, these are similar in very subtle ways.


The original card I found a bit plain, so I dry embossed the tops of the cards for a small bit of interest.


and also used the border punches to flair things up a bit....


The best thing about this card is that it went up very quickly, thus easy to mass produce of so desired.

Thanks for popping by again.

Stuff used:
CS: (SU) Crumb Cake, Very Vanilla, Cherry Cobbler, Jolly Holiday DSP (ret)
Ink: (SU) Old Olive
Stamps: (SU) Tags 'Til Christmas
Punches: (SU) Decorative Label Punch, Scallop Trim Border, Pinking Hearts Border
Other Bits: Cuttlebug "Just My Type" embossing borders, Dimensionals

Lynda xx

Sunday, December 4, 2011

Christmas - Dasher #1

Hi all,

Is anyone else scratching their head and wondering where the time is evaporating??? Every year I get 'organised' earlier and the time vanishes quicker....AAARRRGGGHHHHH!!!!

....and breathe......

My Dasher stamp has come in for a bit of a work oer this Christmas. It started here!!! Over at Inkspirations4U for the Christmas session, we were thrown this colour challenge....


For some reason it jumped out at me. I was inspired by this card on SCS, but I wished to keep it very much more simple. This was my version.....


I made an edge for the circle with the Scallop Trim Border Punch and nipped and eased it onto the circle. The edge on the Decorative Label punch was done by punching another 2 labels from Razz and cutting then in half, one lengthwise, one vertically and placed them to the depth of border required.


I am very happy with the finished product. I hope all of you creative souls out there are "on top" of your Christmas mountains!! Stay sane and I hope to be back soon with some more Christmas fun.

Stuff Used:
CS: (SU) Sahara Sand, Rich Razzleberry, Very Vanilla
Ink: (SU) Always Artichoke, Sahara Sand
Stamps: (SU) Dasher, Contempo Christmas, Weathered BGS
Punches/Dies: SU Scallop Ribbon Border Punch, Decorative Label Punch, Nestabilities Classic Circle dies

Lynda xx


Sunday, May 1, 2011

Vintage Sentiments.....

A short time ago, one of my beautiful blogging buddies celebrated a chronologic advancement in time. She does BEAUTIFUL digi and rubber images. I was trying to think of a card that may meet the high standards she produces herself. I was busting to try out some of my vintage stamps and inks that I got at a craft show (that were gathering dust patiently waiting). The ladies that I am going to show you today are from an English company called Crafty Individuals and these are the gals.....


 Each one of them is just over an inch and a bit square.....or you can stamp them all together. This is my first card that I did with them.....


Very happy with the first attempt as was the recipient (phew). I did realise (too late however) that the flowers should have been set a tad higher so that the card could stand properly!!! Taking this into consideration.....I used the other 2 images and also a different colour palate and made these....


Each card is ever so slightly different. Here are these 3 close up.....


The paper flowers are stamped with a very fine script block stamp and sponged to age them a little. The edges of the CS are also sponged to age them....like this.....


I hope you like them. I had so much fun doing them together. I think you can expect a couple more showings of these ladies.

Stuff used:
CS: (SU) Early Espresso, Bravo Burgundy, Very Vanilla
DP: KaiserCraft - Timeless Collection (Script - P656), Prima - Sparkling Spring Collection (Rosebud - #842673)
Ink: (Tim Holtz Distress Inks) Aged Mahogany, Vintage Photo, Frayed Burlap
Stamps: SU - Best Yet, Amy R - Birthday Sentiments
Punches: (SU) Decorative Label Punch
Other bits: Paper flowers - Prima and Kaiser, Glue dots, Muted Gold and Pink 1/2 pearls

Lynda xx